iOS Web SDK Integration
Learn how you can start integrating with Plural iOS Web SDK.
The iOS Web SDK integration involves the following steps below:
Note:
- Ensure you store your Client ID and Secret in your Backend securely.
- Integrate our APIs on your backend system.
- We strictly recommend not to call our APIs from the frontend.
1. Installation
Install Pine Labs iOS Web SDK using Xcode. To add the SDK to your app, import the .aar file to the project using the following steps:
- Download the SDK Framework: You can download the SDK as a
.xcframeworkfile here, which is in a package format that Apple recommends for distributing binary frameworks. - Add Framework to Your Package:
- Drag and Drop: Simply drag and drop the
.xcframeworkfile into your Xcode project in the Project Navigator under the Frameworks section. - Dialog Box Settings: A dialog box will appear when you drop the
.xcframeworkfile into your project. Ensure that the checkbox labeledCopy items if neededis selected. This ensures that the framework gets copied into your project directory, making it available whenever you need to build the project.
- Drag and Drop: Simply drag and drop the

Watch Out:
Ensure that the minimum compilation compatibility version is set to iOS 16 or 17
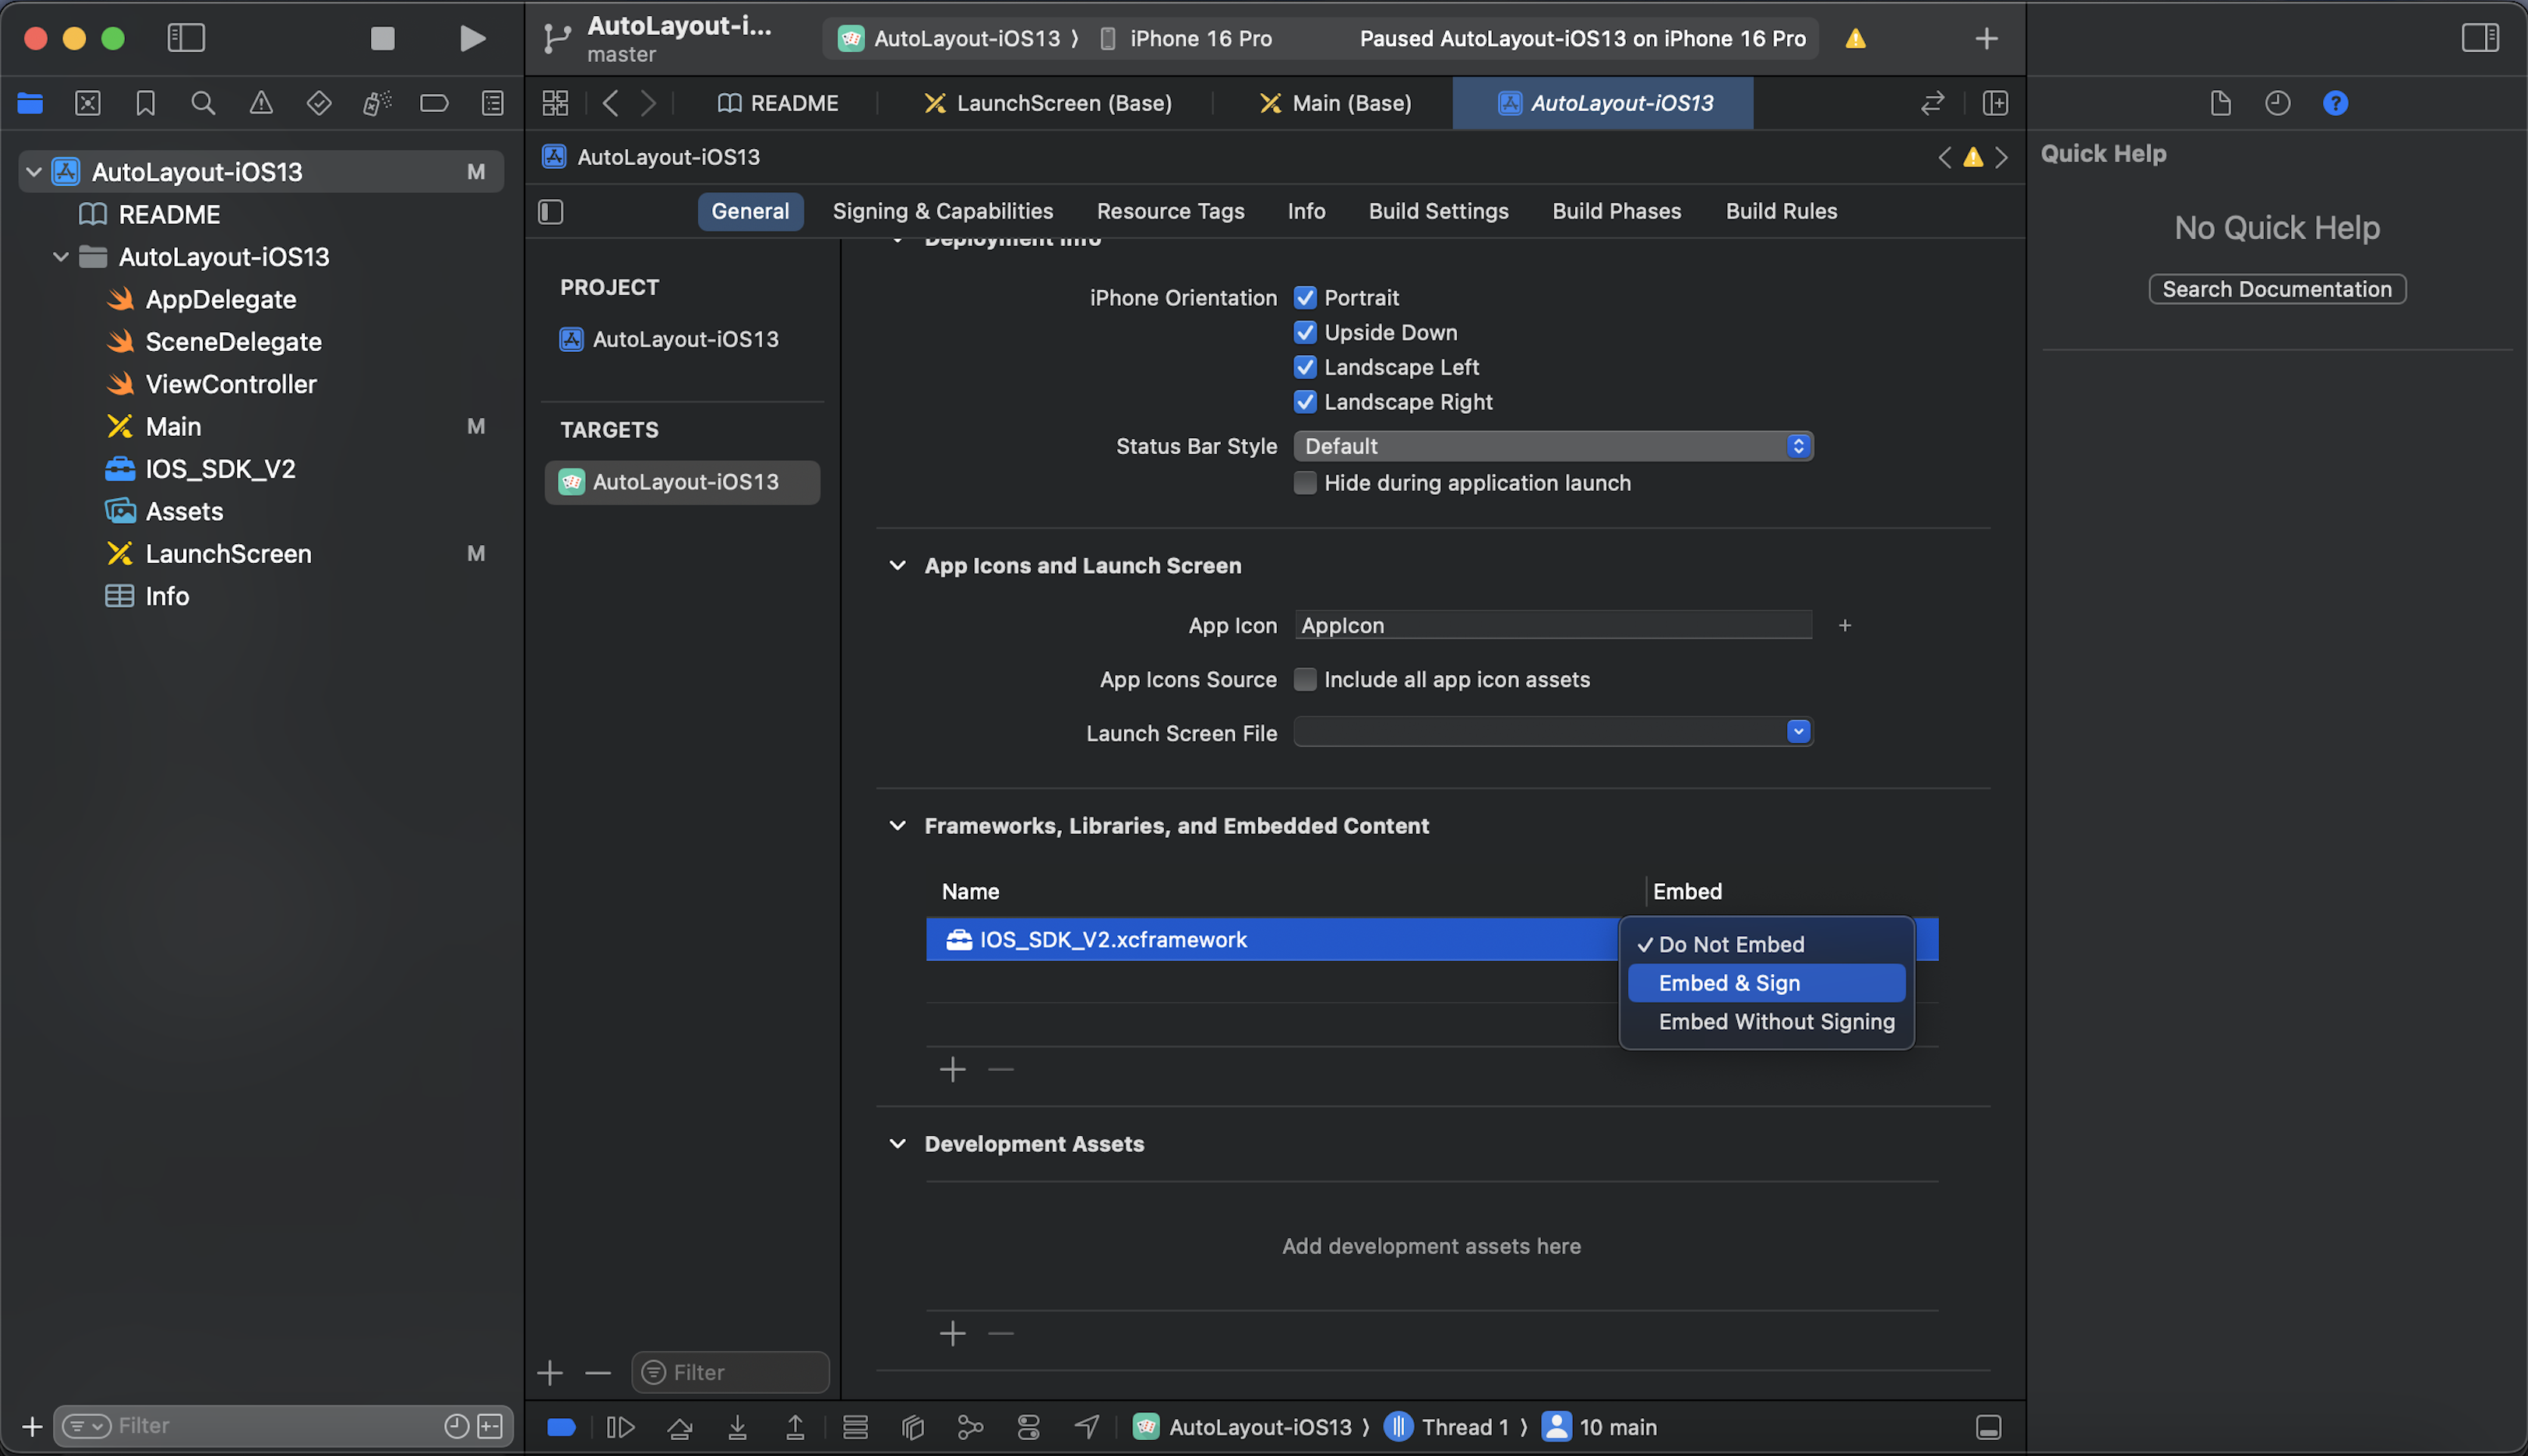
- Configure the App Target: You need to configure the target to embed the SDK framework properly.
- Navigate to the General tab of your target's settings. Add the
.xcframeworkfile under the Frameworks, Libraries, and Embedded Content section. - Ensure you choose
Embed & Sign. This ensures the framework is embedded in your app when it's built and signed properly to run on iOS devices.
- Navigate to the General tab of your target's settings. Add the

Note:
- Once the
.xcframeworkis embedded, you can import the package in the view controller.
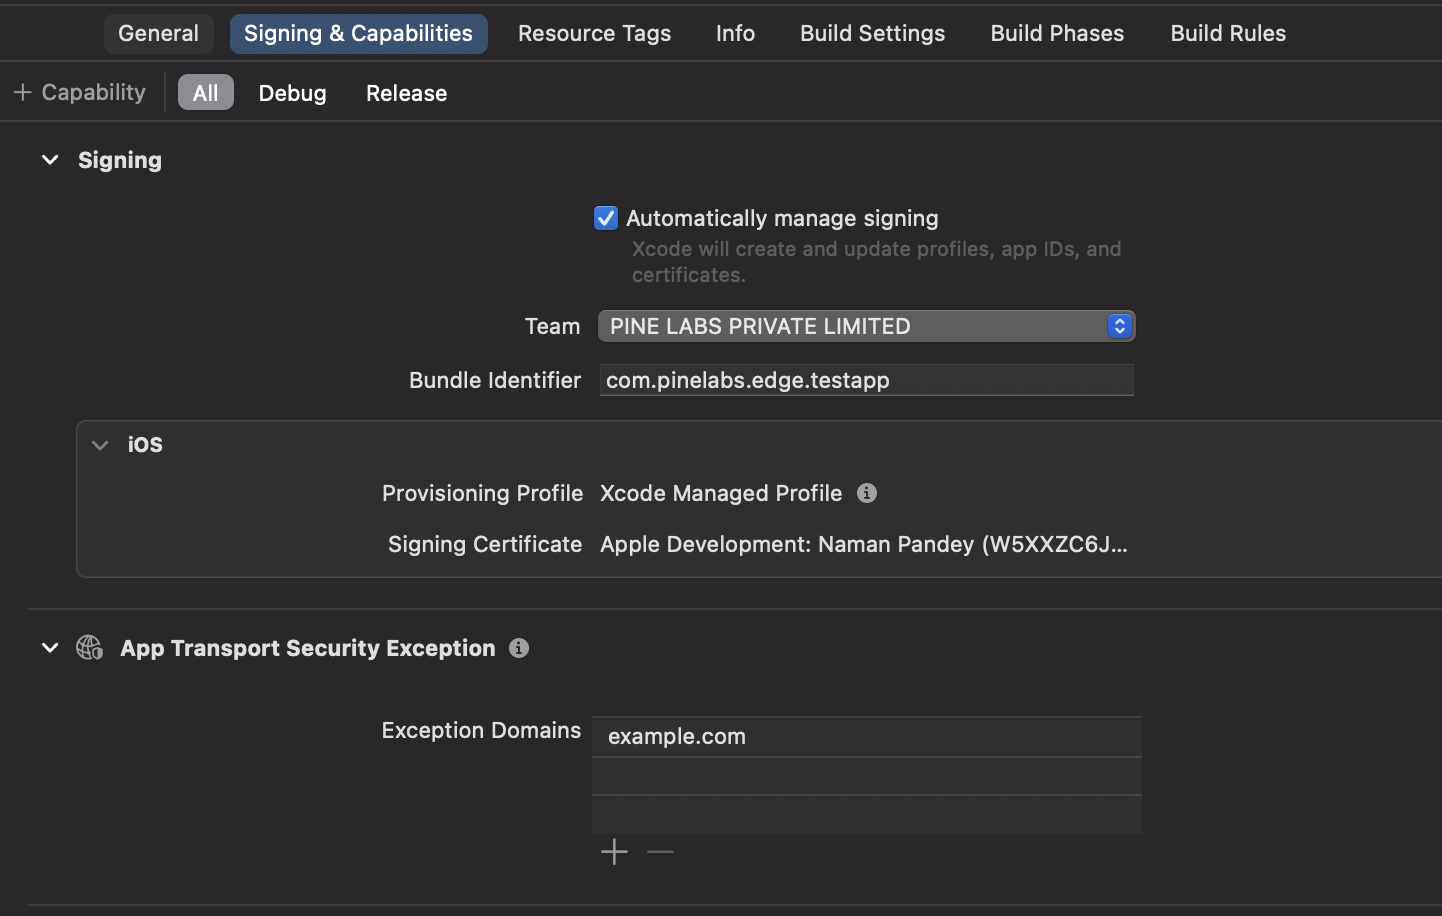
- Network Check: In the SDK, there is an internet connectivity function that accesses a URL (
example.com). To ensure this works as expected, you need to update theInfo.plist[Information Property List] file in your app to allow this connection.
Ensure
- Once this is added, you can check if the exception is being displayed in the Signing and Capabilities tab

2. Integrate APIs in Your Backend
Start a payment by triggering the payment flow. To start a payment follow the below steps:
2.1. Generate Auth Token
Integrate our Generate Token API in your backend servers to generate the auth token. Use the token generated to authenticate Plural APIs.
Below are the sample requests and response for the Generate Token API.
curl --location 'https://pluraluat.v2.pinepg.in/api/auth/v1/token' \
--header 'accept: application/json' \
--header 'content-type: application/json' \
--header 'Request-Timestamp: 2024-07-09T07:57:08.022Z' \
--header 'Request-ID: c17ce30f-f88e-4f81-ada1-c3b4909ed235' \
--data '
{
  "client_id": "a17ce30e-f88e-4f81-ada1-c3b4909ed232",
  "client_secret": "fgwei7egyhuggwp39w8rh",
  "grant_type": "client_credentials"
}
'
curl --location 'https://api.pluralpay.in/api/auth/v1/token' \
--header 'accept: application/json' \
--header 'content-type: application/json' \
--header 'Request-Timestamp: 2024-07-09T07:57:08.022Z' \
--header 'Request-ID: c17ce30f-f88e-4f81-ada1-c3b4909ed235' \
--data '
{
  "client_id": "a17ce30e-f88e-4f81-ada1-c3b4909ed232",
  "client_secret": "fgwei7egyhuggwp39w8rh",
  "grant_type": "client_credentials"
}
'
{
  "access_token": "eyJhbGciOiJIUzI1NiIsInR5cCI6IkpXVCJ9.eyJzdWIiOiIxMjM0NTY3ODkwIiwibmFtZSI6IkpvaG4gRG9lIiwiaWF0IjoxNTE2MjM5MDIyfQ.SflKxwRJSMeKKF2QT4fwpMeJf36POk6yJV_adQssw5c",
  "expires_in": 3600
}
Refer to our Generate Token API documentation to learn more.
2.2. Create Hosted Checkout
Use this API to create a hosted checkout, for authentication use the generated access token in the headers of the API request.
Below are the sample requests and response for a Create Hosted Checkout API.
curl --location 'https://pluraluat.v2.pinepg.in/api/checkout/v1/orders' \
--header 'Authorization: Bearer eyJhbGciOiJIUzI1NiIsInR5cCI6IkpXVCJ9.eyJzdWIiOiIxMjM0NTY3ODkwIiwibmFtZSI6IkpvaG4gRG9lIiwiaWF0IjoxNTE2MjM5MDIyfQ.SflKxwRJSMeKKF2QT4fwpMeJf36POk6yJV_adQssw5c' \
--header 'Content-Type: application/json' \
--header 'Request-ID: c17ce30f-f88e-4f81-ada1-c3b4909ed235' \
--header 'Request-Timestamp: 2024-07-09T07:57:08.022Z' \
--header 'accept: application/json' \
--data '
{
  "merchant_order_reference": 112345171,
  "order_amount": {
    "value": 500,
    "currency": "INR"
  },
  "pre_auth": false,
  "notes": "order1",
  "purchase_details": {
    "customer": {
      "email_id": "[email protected]",
      "first_name": "Kevin",
      "last_name": "Bob",
      "customer_id": "192212",
      "mobile_number": "9876543210",
      "billing_address": {
        "address1": "H.No 15, Sector 17",
        "address2": "",
        "address3": "",
        "pincode": "61232112",
        "city": "CHANDIGARH",
        "state": "PUNJAB",
        "country": "INDIA"
      },
      "shipping_address": {
        "address1": "H.No 15, Sector 17",
        "address2": "",
        "address3": "",
        "pincode": "144001123",
        "city": "CHANDIGARH",
        "state": "PUNJAB",
        "country": "INDIA"
      }
    },
    "merchant_metadata": {
      "key1": "DD",
      "key2": "XOF"
    }
  }
}
'
curl --location 'https://api.pluralpay.in/api/checkout/v1/orders' \
--header 'Authorization: Bearer eyJhbGciOiJIUzI1NiIsInR5cCI6IkpXVCJ9.eyJzdWIiOiIxMjM0NTY3ODkwIiwibmFtZSI6IkpvaG4gRG9lIiwiaWF0IjoxNTE2MjM5MDIyfQ.SflKxwRJSMeKKF2QT4fwpMeJf36POk6yJV_adQssw5c' \
--header 'Content-Type: application/json' \
--header 'Request-ID: c17ce30f-f88e-4f81-ada1-c3b4909ed235' \
--header 'Request-Timestamp: 2024-07-09T07:57:08.022Z' \
--header 'accept: application/json' \
--data '
{
  "merchant_order_reference": 112345171,
  "order_amount": {
    "value": 500,
    "currency": "INR"
  },
  "pre_auth": false,
  "notes": "order1",
  "purchase_details": {
    "customer": {
      "email_id": "[email protected]",
      "first_name": "Kevin",
      "last_name": "Bob",
      "customer_id": "192212",
      "mobile_number": "9876543210",
      "billing_address": {
        "address1": "H.No 15, Sector 17",
        "address2": "",
        "address3": "",
        "pincode": "61232112",
        "city": "CHANDIGARH",
        "state": "PUNJAB",
        "country": "INDIA"
      },
      "shipping_address": {
        "address1": "H.No 15, Sector 17",
        "address2": "",
        "address3": "",
        "pincode": "144001123",
        "city": "CHANDIGARH",
        "state": "PUNJAB",
        "country": "INDIA"
      }
    },
    "merchant_metadata": {
      "key1": "DD",
      "key2": "XOF"
    }
  }
}
'
{
  "token": "REDIRECT TOKEN",
  "order_id": "ORDER ID",
  "redirect_url": "https://api.pluralonline.com/api/v3/checkout-bff/redirect/checkout?token=REDIRECT TOKEN",
  "response_code": 200,
  "response_message": "Order Creation Successful."
}
Refer to our Create Hosted Checkout API documentation to learn more.
3. Initialize SDK
To initialise the iOS web SDK, follow the below steps:
- Import the SDK into the app and,
- Create an object of the class
EdgeControllerto start a payment function. You are creating a function in your app that passes the redirect[challenge] URL to start the payment function of our SDK.
import UIKit
import IOS_SDK_V2

class ViewController: UIViewController {

    func UsingFramework(redirectUrl: String) {
        let IOS_Framework_Object = EdgeController()
        IOS_Framework_Object.startPayment(from: self, withURL: redirectUrl, callBack: ResponseCallback())
    }
}
4. Handle Payments
You need to implement call-back methods to handle your payment responses. This will provide the payment status and reason for transaction failures. Based on the reasons for failures, handling can be built at your end. Transaction callbacks can be listened to via overriding methods of ResponseCallback.
onTransactionResponse: This method is called when the transaction is completed. Transaction can be a failure or a success.
internetNotAvailable: This method is called when the internet is not available.
onErrorOccured: This method is called when SDK is unable to load the payment page.
onPressedBackButton: This method is called when the user presses the back button
onCancelTxn: This method is called when the user cancels the transaction.
public class MerchantCallbackResponse: UIViewController, ResponseCallback {

    public func internetNotAvailable(code: Int, message: String) {
        print("Test app response: internet not available")
    }

    public func onErrorOccured(code: Int, message: String) {
        print("Test app response: error occurred")
    }

    public func onTransactionResponse() {
        print("Test app response: transaction response")
    }

    public func onCancelTxn(code: Int, message: String) {
        print("Test app response: transaction cancelled")
    }

    public func onPressedBackButton(code: Int, message: String) {
        print("Test app response: back pressed")
    }
}
5. Manage Transactions
To get the status of the transaction made from your application, you can use our Fetch APIs to know the real time status.
5.1. Get Order by Order ID
Use this API to know the real time status of the transaction made on your application. Refer to our Get Order by Order ID API documentation to learn more.
5.2. Webhooks
You can configure the webhook events to know the status of your transactions. Refer to our Webhooks documentation to learn more.
Updated 4 months ago
