WooCommerce
Learn how to Install Plural Plugin on WooCommerce platform.
Platform: WordPress
Supported Versions: 3.6.3v to 7.2.2v
Integrating with the Plural WooCommerce Plugin enables seamless payment processing through credit cards, debit cards, and EMI options via the PinePG Edge platform. Below is a simple, step-by-step guide to help you install and configure the PinePG Edge Plugin on your WordPress site for smooth transactions.
Learn how to integrate your WooCommerce site with the Plural Payment Gateway. Watch the video tutorial below for a step-by-step guide.
Integration Steps
The figure below shows the steps involved to Instal Plural plugin.

Figure: WooCommerce Integration Steps
1. Download the Extension
- Navigate here to download the extension file.
- Click on
Code, then selectDownload ZIPto download the extension file.
2. Plugin Installation
You can install the plugin using one of the methods outlined below.
2.1. WordPress Plugin Installer:
Follow the below steps to install the plugin using WordPress Plugin Installer:
- Log in to your WordPress account with admin privileges.
- Go to the Plugins tab in the dashboard.
- Click on the Add New Plugin button.
- Then, select the Upload Plugin option.
- Click on Choose File and upload the previously downloaded zip file.
- Once the file is uploaded, click the Install Now button.
- After installation, click Activate.
- Once activated, you will see a confirmation message, and the plugin will appear under the name Pay securely with Pine Labs in your installed plugins list.
2.2. Manual Installation:
- Unzip the downloaded file and locate the folder inside.
- Copy this folder and paste it into the
<wordpress root>/wp-content/pluginsdirectory of your WordPress installation. - Log in to the WooCommerce admin panel and go to the Plugins section.
- Find the Edge Plugin and click Activate.
3. Plugin Configuration
Configuring a plugin involves setting up and fine-tuning its settings to ensure it functions effectively. Follow the below steps to configure the WooCommerce Plugin.
-
Navigate to WooCommerce > Settings.
-
Go to the Payments tab.
-
Click on the Pay securely with Pine Labs plugin to configure it.
-
Confirm that the payment method provided by the plugin appears in the list. If it’s listed, the installation was successful and is ready to use.
-
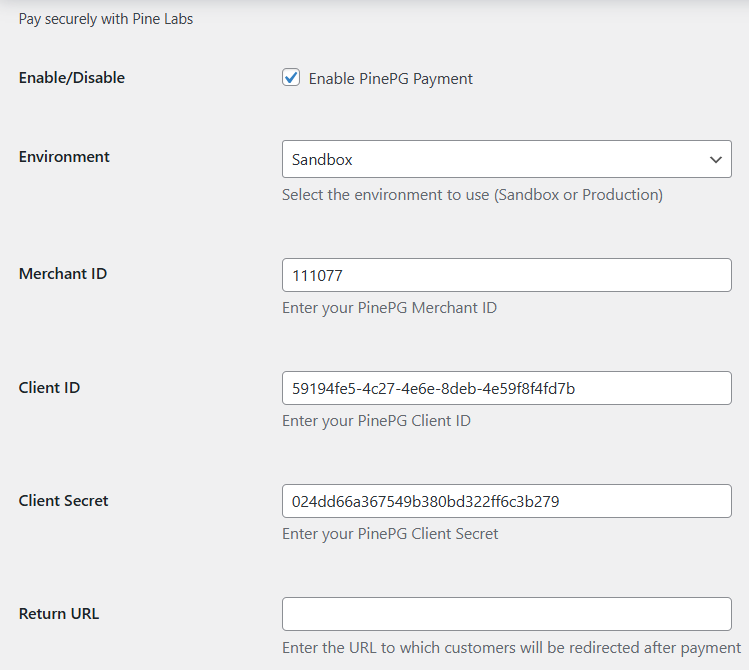
Fill in the required fields:
- Enable/Disable: Select
Yesto enable the module. - Environment: You can set it to
Sandboxwhile testing the plugin orProductionto start live payments from your platform. - Merchant ID: Enter the merchant ID based on the selected environment (Test / Live).
- Client ID and Client Secret: Provide the credentials specific to the chosen environment.
- Return URL: Leave this field blank. It will be automatically determined based on the current domain in WordPress.

- Enable/Disable: Select
-
After successfully installing the extension, you can see the payment method for your extension on your Checkout Page.
For example, when you click Place Order you will see the payment gateway window where you must choose your payment options. -
After completing the payment successfully, you will be redirected to the transaction
Successpage or aFailurepage.
Note:
- Plural Plugins do not apply shipping fees or any additional charges. Therefore, the cart value should match the product value.
- Please note that any additional fees, such as TDR, GST, or others, are not managed by our plugins and must be handled manually by the merchant.
Updated 26 days ago
